Frequently Asked Questions on Sweet Pickins Milk Paint
answered by Sweet Pickins Milk Paint owner Sausha Khoundet
1. What colours are there?
There are currently 33 colours with a new one added in every couple of months.

2. How much does one package of paint cover?
One pint will cover 36 sq ft, one quart is 72 sq ft and a sample is 12 sq ft.
You do need to keep in mind that coverage varies a lot depending on the piece you are painting
(how light or dark it is compared to the color your painting it), how many coats you do, how thick or thin
you mix your paint, type of brush used and your painting technique.
Whites tend to take 3-4 coats, whereas colors normally take 2 coats, sometimes even just 1.
3. What do you mix the paint with?
True milk paint comes in a powder form and just mixes with water.
Mixing is one of the things that intimidates people the most about using milk paint.
But the fact that it comes in a powder form shouldn’t scare you!
In fact, having the paint come in a powder means you can determine the consistency you want your paint to be. And everyone likes theirs a little different.
4. How to mix the paint by stirring?
Stirring: The most common way to mix the paint is by adding water to the powder and stirring.
Or add powder to water and then stir it. Try both ways and see what works for you.
Either way, the key here is stirring! You cant skimp on the stirring!
- Measure out the amount of paint that you want to mix up and add that to a cup.
I don’t recommend mixing up your entire package of paint at once unless you know that
you are going to use it all.
- Using hot tap water, add equal parts water to the paint. I find that the hot tap water
helps the clumps dissolve the best.
- Stir, stir, and stir some more!!!
You can mix it up with a stir stick, spoon, etc. I personally like using a stir stick as it has a flat bottom and i can scrape the powder from the bottom of the jar. To really get the paint mixed and a smooth consistency, you should stir for about a minute to a minute and half to get out most of the clumps.
I do find that the whites always tend to be a bit more clumpy and are a little harder to mix smooth than the colors. But don’t be worried about small clumps in your paint, those normally flatten out when you brush on the paint and when you sand your piece smooth in the final steps.
Some people like to add just a small amount of water to begin with and work the paint into a paste and then add more water. I normally don’t do it like this, but give it a try and you may like it.
The consistency i can best describe that you want your milk paint is that of a half melted milk shake. You never want your paint to be so thin that you have runs and drips everywhere, and you definitely don’t want it so thick that its hard to paint smoothly with. If your paint brush is dragging at all, then you have it too thick. You can control how you want your paint to be, so if you like thinner paint, then by all means make it thinner! I often go a little thicker on the 1st coat and then thinner on the 2nd.
The instructions call for equal parts water to powder and i find this correct in most cases. But keep in mind, that as your paint sits, it does thicken up. Often I find that i have to add a very small amount of water during painting to get the paint back to the right consistency. The paint also does tend to start settling to the bottom of the cup and begin clumping as it sits. Again, I find that this is only with certain colours, especially the lighter ones and it doesn’t always happen.
Just remember, that you must stir the paint throughout using it to keep it smooth. I normally just keep my stir stick in the paint jar so i remember to stir it.
5. How to mix the paint by shaking?
Lately, I have been shaking my paint rather than stirring and really like this method.
I find that i can get the paint smoother faster.
(Of course everything we talked about above such as the consistency, ratios, stirring throughout painting, etc. all still apply here so i wont go over those again.)
- For this method, you need a container with a lid. I normally just use mason jars or we save lots of jars from the kitchen so i can use them for mixing paint.
- Start by adding hot tap water to your jar. Again, don’t mix up your whole bag of paint.
Just what you think you are going to use.
- Next, add your powder to the jar. If you are a measurer, then you would have measured out
your water and then you will add the same amount of powder. I am not a measurer, i am an eyeballer :)
– Put your lid on the jar and shake, shake, shake!!
Again, i find that the whites i have to do more shaking and the colours not as much.
The whites I shake for a good minute, the colours about 30 seconds.
– The one drawback i have found to shaking rather than stirring is that with some colours,
the paint gets foamy. I used to let the paint sit for a bit for the foam to dissolve, but now I just
either go ahead and start using it right away or give it a quick stir to incorporate the foam.
You could even strain it to get rid of the foam.
- One of the advantages of using the lidded mason jar is that whatever paint you don't use,
you can just put the lid on it and store it in the fridge.
Remember though, storing is not recommended as the paint may gel up soon after mixing.
Only mix what you need and mix more if you have too.
With either method, if you make your paint too thin just add a little powder.
If it's too thick, add a little water. Both methods work great for mixing the milk paint.
You just need to experiment and find the way that you like the best.
I tend to like the shaking method best right now, but i always change things up and go back and forth depending on my mood! Some people even use blenders or hand held mixers for mixing up the paint
(just remember if you do this, only use it for milk paint and not food).
You could even use a drill attachment that’s made for stirring up paint. You have lots of options :)
And remember, one of the advantages of having the paint come in a powder, is that you can make
it as thin or as thick as you like, or depending on the project that you are working on!
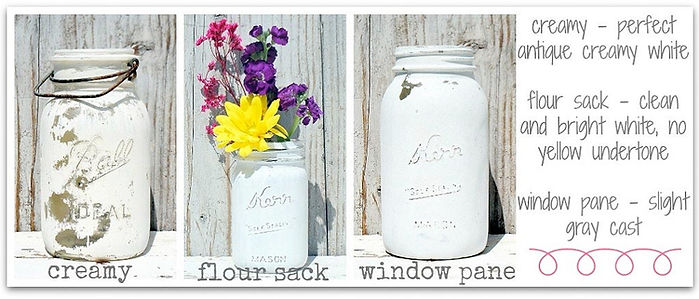
6. What is the difference between the 3 whites?